The woes of Gotek Jumpers for IBM-PC

The Gotek USB floppy emulator, especially with the open firmware Flashfloppy has become a staple for many retro enthusiasts for upgrading old computer systems with a “modern” solution for loading software on the old systems. I am also one of these enthusiasts. As a retro system builder especially of the IBM-PC compatible kind, I am used to configuring these systems using jumpers. No “plug and play” feature here. The Gotek has also some jumpers you must set for using it on an IBM-PC. IBM-PCs make use of a cable that you can connect to two disk drives to one controller.

The selection of which drive is drive A: or drive B: is determined by the distinctive twist in the cable between the connector in the middle and the connector on one of the ends. If the drives you want to connect have jumper for setting the drive ID then both drives need to be set drive ID 0. This is especially the case for most 5 1/4 inch floppy drives, the later 3.5 inch disk drives often do not have drive ID jumpers and are set to ID0 by default.

The Gotek floppy emulator has also such a jumper S0 en S1 and this needs to be set to S0. However, there is another jumper JC on the Gotek, which in conjunction with the setting in the FF.cfg file (see highlighted code below the image) for flash-floppy to determine that the drive is in IBM-PC compatibility mode. I configured several Goteks in this way on my retro IBM-PC systems.
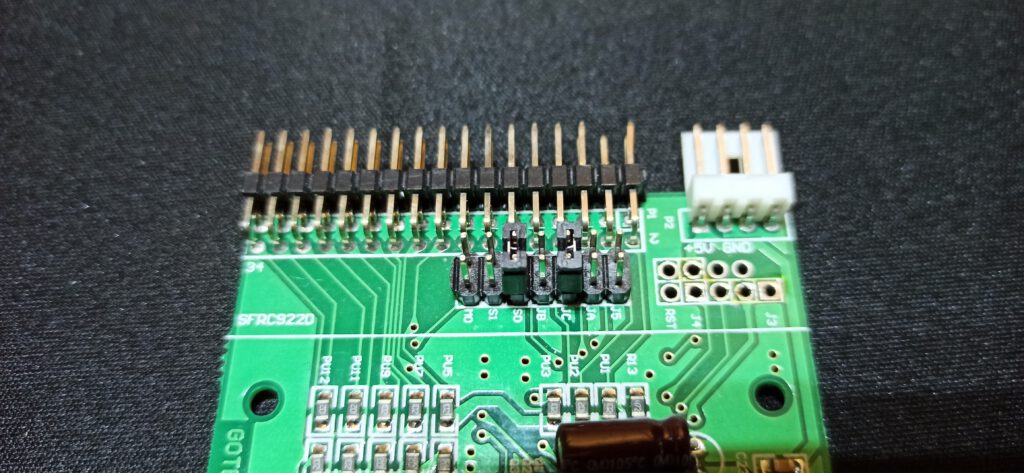
The default Gotek jumper setting for IBM-PC, bridging S0 and JC
# Floppy-drive interface mode
# shugart: P2=DSKCHG, P34=RDY
# ibmpc: P2=unused, P34=DSKCHG
# ibmpc-hdout: P2=HD_OUT, P34=DSKCHG (not generally needed: prefer 'ibmpc')
# akai-s950: P2=HD_OUT, P34=RDY (Akai S950)
# amiga: P2=DSKCHG, P34=DRIVE_ID (not generally needed: prefer 'shugart')
# jc: JC closed: ibmpc, JC open: shugart
interface = jc

So having this presumed knowledge I got a new Gotek drive in and set the S0 en JC jumper and connected. But to my surprise, the drive did not work. Troubleshooting went from, checking the FF.cfg on the USB drive used, trying different locations on the cable, using a known working cable, checking with a known working Gotek and floppy drives, also in combination with the new Gotek at different positions on the cable, even reflashing the firmware and checking the disk controller. All to no avail. I even started thinking I was duped out of my money by a fake unit. So I started examining the board of the Gotek. I knew there were different incarnations of the thing, some versions best to be avoided. Then I noticed that the New Gotek was different from the previous working one.
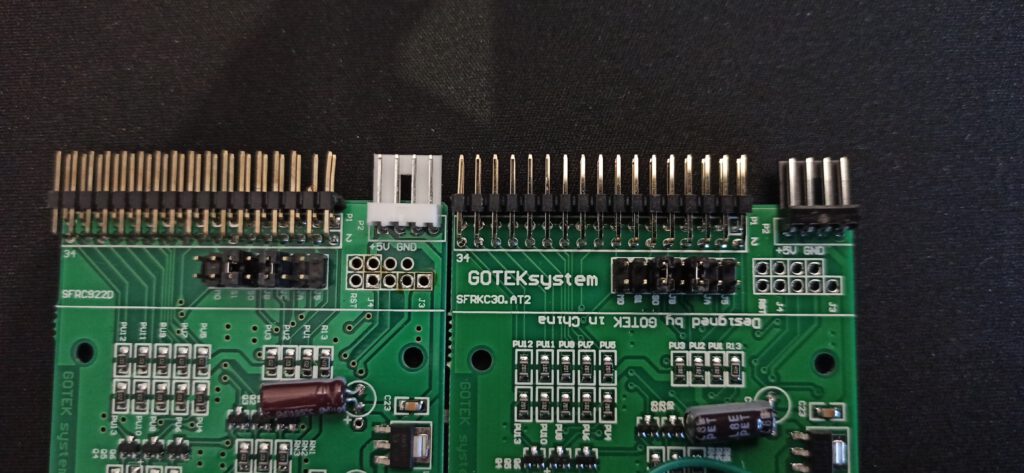
Two different version of the Gotek, left my older SFRC9220 and to the right my newer SFRKC30.AT2 version. Note that label JC is missing from the third jumper from the right.

Gotek SFRKC30.AT2 has no JC jumper!!

The older Gotek I had laying around had as board number SFRC9220, the newer Gotek was labelled “GOTEKsystem” with board number SFRKC30.AT2. I was already reading through the Flashfloppy wiki to see what could cause the problem and was now looking for information on this particular iteration of the Gotek. In the Gotek compatibility section, some are listed and there I noticed this side note: “SFRKC30.AT2 (QFN32): Missing the original rotary-encoder header, but features the new KC30 rotary header. Also missing JC jumper location.”. A bit confused I looked back at the board and now noticed the JC label was missing from one of the 7 jumpers, but there was a jumper header. This jumper header is not functional, so even when bridged a Gotek SFRKC30.AT2 with USB stick having the interface=jc setting activated in the FF.cfg file, will think the drive is in shurgart mode not ibmpc mode. And voila, changing this setting in the FF.cfg file from settings=jc to settings=ibmpc made my new Gotek work flawlessly on my 286 build.

So to summarize, when using a Gotek with board SFRKC30.AT2 in an IBM PC compatible, you only have to set jumper S0 and make sure that the flashfloppy FF.cfg file has the interface parameter set to ibmpc and not jc.

Spotify connect ready or not?

medion-life-p69055-md-83867-865x433

Medion Life P69055 (MD 83867)

A couple of years back, I bought a wifi-speaker which seemed to have everything for it. It sounds good, it looks good (reddot design award), easy to setup, what’s not to like? I bought this device as a replacement for my radio in my kitchen with idea that I still could listen to webradio but also could stream music using Spotify connect. Yeah, but then your device should be Spotify connect ready, isn’t it? True, there are wifi speakers out there that do not support Spotify connect. But this was not a real impuls buy, and I informed myself well about this device technical background and concluded that it supported Spotify connect. I was however greatly mislead.

The Medion Life P69055 (MD86867)

screenshot_20161022-112920

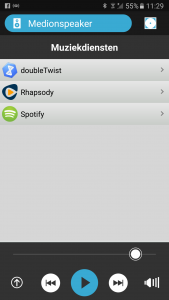
The Medion app even lists Spotify?!

The device I am talking about is the Medion Life P69055 (MD 83867), that I bought just under a €100 at Aldi. Some of you will say, aha Medion and Aldi, whomever would buy an appliance there, its a supermarket! However in my experience and I have owned several Medion Akoya PCs, is that Medion is not great, but far from bad. But still the P69055 seemed to have everything for it. It uses Quallcomm’s Allplay technology which according this press-release by Quallcomm is Spotify connect certified. The Medion P69055 is also featured on the Spotifygear.com website, that lists available Spotify connect devices and as far as I can tell this site is endorsed by Spotify. When I got the device, installed it and started using the Smartphone app to control it, it has a separate menu for streaming services that lists Spotify next to Doubletwist and Raphsody. However when you select Spotify it only starts the Spotify app. In the Spotify app any available Spotify connect device should be seen at the bottom of the screen, but the P69055 never shows up. First I thought this could be due to some port-forwarding issues on my router, but I could put that to bed, after tests with other devices. So finally I called the Medion helpdesk.

Helpdesk BS

I really loath these “non skilled” helpdesks, which only seem to use scripted answers, that only help total nitwits. Sometimes I even seem to hear, that the person on the other side of the phone-line, actually does not understand what they are telling me. Generally, they never know how to deal with a bit more technical savvy person like me. So the advice was to put it in writing on their support page. So I did, added the evidence above to show that it should work and that it was even intended to do so, in view of their own Life-stream speaker control app. The answer I got was total BS, blaming Spotify for not supporting DLNA. A clear diversion of the issue to something outside of Medion’s influence, the oldest tactic in the book. Shame on you Medion!

Where is the firmware?

In the meanwhile I also posted the same question on a Spotify forum and there I got an answer that struck me as more valid. Yes, Quallcomm Allplay devices are Spotify connect certified, but may need a firmware update to work. So I was still positive that a firmware update would arrive and Spotify Connect would start working. The last update was somewhere in the last quarter of 2014, I believe, but no Spotify connect and no more firmware updates since. So I have given up hope that this will ever happen.

Conclusion

I do not know if this is, a can not or will not by Medion, but I can only conclude that the Medion P69055 (MD83867) does not, I repeat NOT support Spotify connect. If Spotify has something to do with the Spotifygear website, they also should remove the P69055 from the list as this is quite misleading. So did you return the device, you might ask? No. it was to late for that. However I thought of a DIY fix, which was an extra cost, but it does the trick. I will eleborate on that in a next post.